
Mine is in the walk-through from the garage to the kitchen.
I have the hardest time coming in through the garage with an armful of groceries or ANYTHING because that little area is so cramped.
Let's move the dryer to the garage, and create a drop zone/mudroom where it used to be!
My washer is behind the door, opposite the dryer. It is staying where it is. I did redo that half of the utility room though!
To move the dryer to the garage, it will require an electrician. It shouldn't take him too long, especially since my dyer is close to the circuit panel anyways.
To save on costs, I didn't bother to vent the dryer through some fancy hole in the roof; I just directed the aluminum hose pointing outward. All the hot air will just blow out into the garage, and since my garage isn't insulated, I'll heat it in the winter, and just crack the garage door in the summer so the hot air blows right outside.
 |
| You can view my DIY on the drying rack here |
It's awesome having my dryer in the garage! More space in the house!
This leaves a great big hole where my dryer was.
I can now go through the utility room with groceries, close the door to the garage behind me, and not play whack-a-mole with my appliances.
Here's how to create a nice mudroom nook/drop zone where the dryer used to be.
This is where I started after moving out the dryer:
This is where I started after moving out the dryer:
 |
| I kinda turned it into a drop zone already...for all my crap. Let's organize this! |
I drafted a plan first (sorry this picture is so bad, I tried to sharpen and brighten it :-(.
Below is a side and front view of my nook, and what height I want my shelves at/other dimensions.
Below is a side and front view of my nook, and what height I want my shelves at/other dimensions.

I wanted a seat that could fit my cat's huge OmegaPaw litter box underneath it...

...a shelf above my head to put baskets, a hook rack, and four shelves along the side (partially inside the drywall) for shoes/purses.
 | ||
| This huge thing, which I couldn't do without, TBH.I totally recommend it. You never have to get your hands in the litter box ever again. |
...a shelf above my head to put baskets, a hook rack, and four shelves along the side (partially inside the drywall) for shoes/purses.
This is the concept for the seat bench, and the shelf above my head.


My seat bench is 3/4" thick plywood. Anything thinner and I'll risk it breaking. To be safe, I also installed a heavy duty bracket on a stud under the seat.

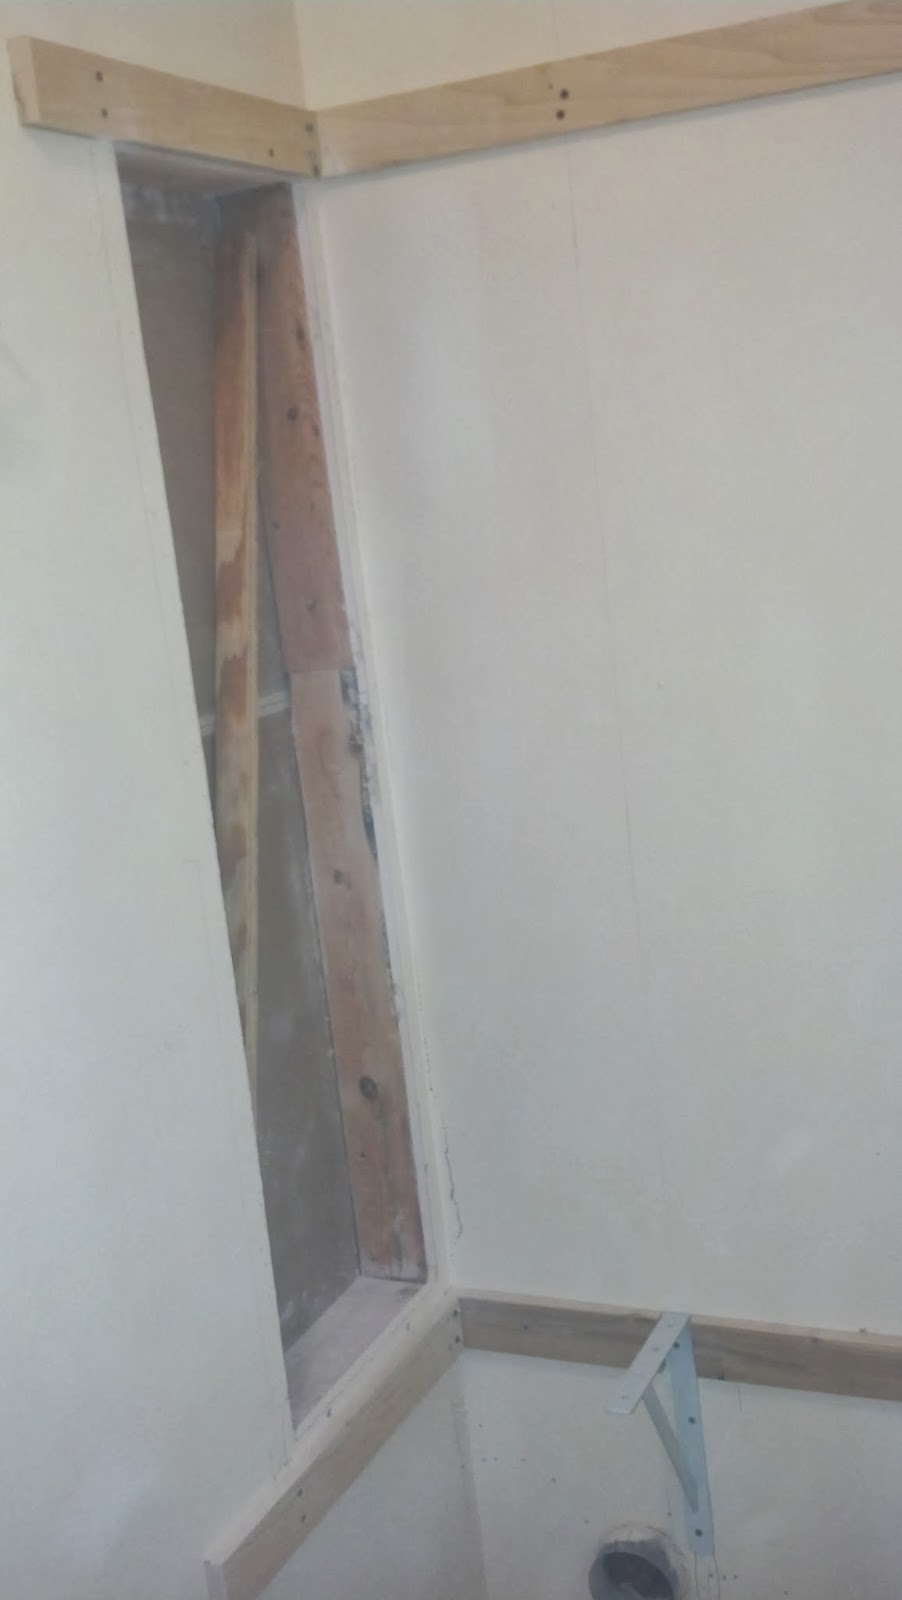
The hole in the wall on the left is part of my shoe shelves, (I'll get there in a minute).
Those rails on the sides are 20" long, and the rail along the back of the nook is 36.5". I screwed them into studs, making sure they are level with a leveler. I attached the brace to a stud also.
I wanted my shoe shelves to fit between two studs, and to actually be partially INSIDE the wall, so that they don't invade the seating space too much. So using a jigsaw, I cut a hole between two studs.
The board in the hole is what I'm going to use to frame the hole.
I also screwed in the 3" wide rails for the shelf above my head. You can see it above too. I decided to make that shelf 14" deep.
I glued down the shelf that I would be sitting on (the 3/4" cut plywood), clamped it to its rails, and let it dry. I did the same for the shelf above - glued and clamped.
I bought some 1/4" luan board, and cut it in the dimensions for my shoe shelf:
- Two sides: 4' tall (since there was a stud on the right side of my shoe shelf preventing me from making the shelves flush with the wall, I had to install a spacer between one of the shoe shelf walls and the back of the nook.)
- Three shelves: 14" deep (since they went in the wall, they stuck out only 10" into the bench) There will be 4 shelves total since the bench will count as the bottom shelf. I needed shelves 14" deep because Dear Husband's shoes are big!
- A single 2x4 cut to frame (plug up) the bottom and top of the holes I cut in the drywall.
 |
| The red box shows the 3/4" gap from the rails to the bottom of the shoe shelf, so that when I lay down the bench, it will be flush with the shoe shelf. |
I screwed my 4' luan pieces right into the studs, so they wouldn't budge! Using little corner braces, I attached the shelves:
 |
| I'm sorry it's kind of cloudy, there was a lot of Sheetrock dust floating around. (I wore a respirator). |
I got another 3" poplar board, and screwed it into studs for my coat hook rack. *Since I wanted my coat hooks to be evenly spaced apart, I needed to screw them into a board that is first screwed into studs.
 |
| See the coat hook rail? Almost done! |
Then, in order to make these look like built-ins, I caulked everything, even along the tops and bottoms of the rails for the bench and upper shelf:

Then I glued some 3/4" molding to the edge of the shelves for a very official finished look (it's held on with painter's tape):

And I painted it the same color as the walls.
I bought my baskets, which my cat promptly explored:

Installed the hooks and made a little curtain on a tension rod to hide the litter box :

Finished! I had to take a picture from the doorway into the garage because I couldn't get the whole mudroom in one shot...

I love this little drop zone, purses, coats, backpacks, keys, and hats all go here.
It took me only a weekend!!