
WARNING: THIS POST IS FOR EXPERIENCED DIY-ERS; IF YOU DO NOT HAVE GENERAL KNOWLEDGE OF CARPENTRY, BUILDING CODES FOR YOUR NEIGHBORHOOD, OR PROPER TOOLS, PLEASE CONSULT A PROFESSIONAL.
Don't you hate it when your builder's grade range hood just recirculates the stinky air from your kitchen?
For me, it's so bad that when I cook tacos and tortillas (or even broil chicken), with my recirculating microwave hood on the entire time (and windows open!), the smell is SO BAD I can smell it from my bedroom and it actually keeps me up at night.
I wouldn't call it an oversensitive sense of smell, it's just all the grease from the meat and the smoke from the oil I cook the tortillas in is so powerful...it's... well... overpowering!
I've always wanted a range hood that vents to the outside. Just vent all those yuckies out of doors so that you don't breathe them (and neither does your family!)
Here is my current range hood, a microwave/hood combo that recirculates air:

When you see my in progress pictures, you will notice that I had raised my cabinets, installed shelving beneath, and repainted the cabinets.
So now my goal is to switch out my existing microwave hood for a ducted hood. ("Ducted" means vented to the outside.)
First, here's the bare area above the stove:

I think AKDY has great range hood styles. I love the glass.
This is the exact one that I bought on Amazon for $259.
 |
| It's all "European style" |
So, first, I had to measure the ducting. It was 6" diameter on the hood. However, I didn't want to cut holes that big, so I bought a duct converter from Amazon.
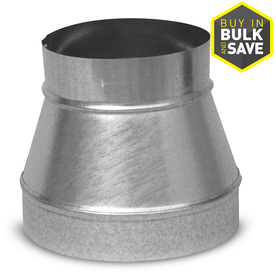 | ||
| It's also great for a megaphone. Or building robot parts, so my husband says. |
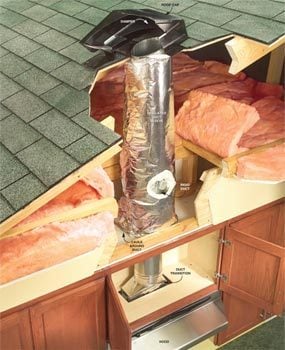
To cut a vent hood for an interior wall kitchen, you'll have to go through the roof. I found this tutorial to be helpful:
Then I added a little backsplash for the chimney area only, without covering up the outlet for powering the hood. Then I glued a very thin piece of luan to the bottom of the cabinet because someone drilled huge holes there for the microwave.

I measured and marked where my duct would leave the unit and need to go through the cabinet:

And drilled a hole in the middle. Then, using a jigsaw, I cut the hole out:

Next came the cutting a hole through to the exterior wall.
Since exterior walls have insulation, I wore long sleeves, eye protection, gloves, and a respirator. It's important to protect oneself from that fiberglass.
So, I cut a hole through the drywall, and pulled out the insulation around the hole in the back wall of the upper cabinet:

Behind the insulation will be a thick piece of plywood. This is the last barrier between the inside and the outside of my house. Now, I was drilling high enough that my vent would come out under the eaves. If you were doing this, you would want to carefully measure so that you know where you're cutting on the outside of the house (the other side of this wall could be brick, for example!)
For myself, however, there was nothing but empty space behind this plywood, leading under the eave:

I drilled a hole (going down through the eave). I then cut a 4" hole out of the eave.
I bought a soffit exhaust vent :
:

I fed the flexible aluminum duct from the inside, through the cabinet, through the wall, and out under the eave...

Then, using duct clamps , I fastened the duct to the vent:

Put caulk galore around the seam of the vent, and screwed it in.
*Upon reflection, caulk really wasn't necessary*


I still had a hole in my interior/exterior wall, where there was exposed insulation. So I bought spray-expandable foam and filled the hole (from inside my cabinet to the outside wall where the hose came out. This negated the need for me to insulate my flexible duct):

Then I peeled off the protective paper from my stainless steel range hood, and here we are!

Doesn't it look amazing!!??
I have to give you one more before and after:
Before:

And AFTER! (hadn't painted my lower cabinets or the countertops yet).

It's a completely different kitchen after all my work on it!
Here is the underside of the range, and the buttons are touch sensitive:

I LOVE this thing. The experts say to get a hood that can circulate twice the cubic feet per minute (CFM) of the square footage of your kitchen. My kitchen is 144 square feet, so I should have gotten something around 300 CFM. Well, this baby moves 760 CFM! And it's super quiet. I love how it's round. I just like the uniqueness of it. :-)
I have no more smells at ALL. I would recommend venting to the outside for everyone!!! (If you go into the side yard while I'm cooking though, you'll smell what's for dinner).
Sorry it's all exclamation points, that how much I love not having stink in my kitchen. This is the BEST thing I've ever done for my kitchen, and any kitchen in the future will have to have a ducted range hood!
If you're doing this yourself, and have any questions, let me know in the comments, and I can try to help you!
So, I cut a hole through the drywall, and pulled out the insulation around the hole in the back wall of the upper cabinet:

Behind the insulation will be a thick piece of plywood. This is the last barrier between the inside and the outside of my house. Now, I was drilling high enough that my vent would come out under the eaves. If you were doing this, you would want to carefully measure so that you know where you're cutting on the outside of the house (the other side of this wall could be brick, for example!)
For myself, however, there was nothing but empty space behind this plywood, leading under the eave:

I drilled a hole (going down through the eave). I then cut a 4" hole out of the eave.
I bought a soffit exhaust vent

I fed the flexible aluminum duct from the inside, through the cabinet, through the wall, and out under the eave...

Then, using duct clamps

Put caulk galore around the seam of the vent, and screwed it in.
*Upon reflection, caulk really wasn't necessary*

Then, going back to the inside, I made sure that the mounting plate for the range hood was level and screwed into studs, then husby helped me lift the range and mount it on the wall!
I had attached the duct reducer to the output of the range prior to install, and it went right through the bottom of the cabinet as planned:

I attached the other end of the flexible duct to the reducer, clamped it tight, and I was almost done!!

I still had a hole in my interior/exterior wall, where there was exposed insulation. So I bought spray-expandable foam and filled the hole (from inside my cabinet to the outside wall where the hose came out. This negated the need for me to insulate my flexible duct):

Then I peeled off the protective paper from my stainless steel range hood, and here we are!

Doesn't it look amazing!!??
I have to give you one more before and after:
Before:

And AFTER! (hadn't painted my lower cabinets or the countertops yet).
It's a completely different kitchen after all my work on it!
Here is the underside of the range, and the buttons are touch sensitive:
I LOVE this thing. The experts say to get a hood that can circulate twice the cubic feet per minute (CFM) of the square footage of your kitchen. My kitchen is 144 square feet, so I should have gotten something around 300 CFM. Well, this baby moves 760 CFM! And it's super quiet. I love how it's round. I just like the uniqueness of it. :-)
I have no more smells at ALL. I would recommend venting to the outside for everyone!!! (If you go into the side yard while I'm cooking though, you'll smell what's for dinner).
Sorry it's all exclamation points, that how much I love not having stink in my kitchen. This is the BEST thing I've ever done for my kitchen, and any kitchen in the future will have to have a ducted range hood!
If you're doing this yourself, and have any questions, let me know in the comments, and I can try to help you!